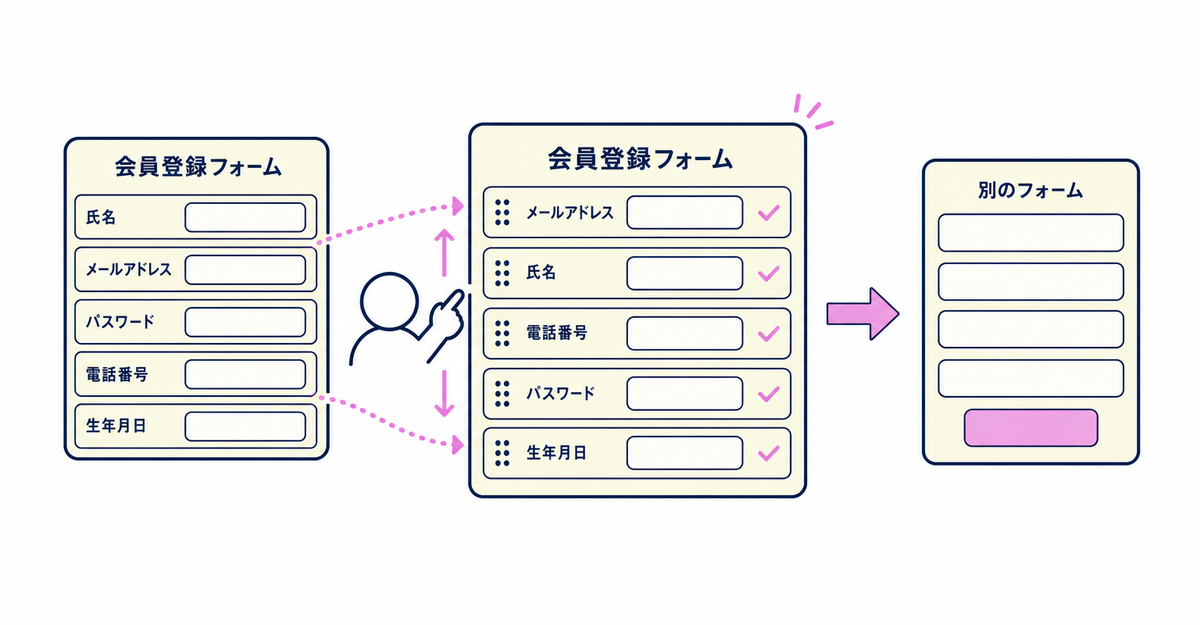
In short: To change the order of fields you've added to your sign-up form, open the sign-up form editing screen in Howdy. Use the up and down buttons to move each field, then click the save button. You can adjust the display order and placeholders of address fields individually. If you want to split fields across forms instead of putting them all in one form, create multiple sign-up forms and use form IDs to send customers to different forms.
Key points
- Change the order of fields you've added to your sign-up form with the up and down buttons on the editing screen, then click the save button
- When you add address fields, you can set their display order and placeholders individually on the editing screen, and you can choose to add or omit the country field
- To split fields across forms, create multiple sign-up forms and specify form IDs in theme blocks or buttons to send customers to different forms
- If you choose "Specify in code" in General Settings, you can set separate destinations for each button: one after login, one after sign-up, and one for customers who are already logged in
Where do you change the order of fields you've added to your sign-up form?
On the sign-up form editing screen in Howdy, click the up and down buttons on a form field to move it where you want it, then click the save button. On the same editing screen, you can also add fields and edit each field.
- In the Shopify admin, open the Howdy New Customer app and go to the Registration Form Settings page
- Open the sign-up form editing screen
- Use the up and down buttons on each form field to move the field where you want it
- Click the save button
The steps for adding fields to your sign-up form and making them required or optional are in How to add a sign-up form to new customer accounts (Howdy) and How to make sign-up form fields required or optional in Shopify: customer metafield settings.
| Field type | Examples |
|---|---|
| Shopify fields | Name, phone number, postal code, prefecture, city, street address, building name, room number, and more |
| Custom fields (customer metafields) | Birthday, terms of service consent, and more |
Sources: Howdy Help: "③ [Initial setup] Registration Form" / Howdy Help: "How to collect birth months and issue birthday discount coupons" (Japanese) / Howdy Help: "How to set character limits on sign-up form fields" (Japanese)
Where do you set the order and placeholders of address fields?
Add and adjust address fields with the following steps.
- In the Shopify admin, open the Howdy New Customer app and go to the field editing screen of your sign-up form
- Click "Add Shopify field"
- Select the address fields from the list and click "Add"
- If you also serve international customers, add the countries you want from "Edit"
- Adjust the display order and placeholders, then save
A placeholder is sample text shown in light gray inside an input field to guide customers. You can change it for each field as needed. If you only serve domestic customers, you can omit the country field entirely. If you add countries, you can also choose a setting that shows a country drop-down on the form.
| What you can set | Where to set it |
|---|---|
| Display order of address fields | Address field editing screen |
| Placeholders (guide text in input fields) | Address field editing screen |
| Adding or omitting the country | "Edit" on the editing screen |
| Showing a country drop-down | Editing screen (optional setting) |
The address fields you can add are postal code, prefecture, city, street address, building name, and room number. If you arrange them in the order postal code → prefecture → city → street address and building name → room number, the order on screen matches the order in which customers enter their address. The setup for combining these fields with address auto-fill is in How to auto-fill addresses in Shopify and prevent shipping errors: postal code lookup and checkout validation.
Source: Howdy Help: "How to set up address input" (Japanese)
What if you want to group fields?
Create multiple sign-up forms and use form IDs to send customers to different forms. In Howdy, you can create multiple sign-up forms from Registration Form Settings. When you specify a form ID, you can make a button that opens only that form.
To create a form, click "Create form", enter a "Form title", and click "Save". Then add fields with options such as "Add custom field". The next section explains how to send customers to the forms you've created.
Sources: Howdy Help: "Setting up multiple forms" (Japanese) / Howdy Help: "How to set up terms of service with a link" (Japanese)
How do you send customers to multiple forms?
In the theme editor, add the "Registration Form" block and add a form ID to the block. To specify the form in code, add the form ID in the data-form attribute of a button with the howdy-register-original-trigger-btn class.
- In the theme editor, add the "Registration Form" block
- Add a form ID to the block (the button then opens only the form with that ID)
- To specify the form in code, add the form ID to the button in the
data-formattribute
Howdy Help shows the following code example.
<button
  class="howdy-register-original-trigger-btn"
  data-form="b3d0bk"
  data-login-redirect="/"
  data-register-redirect="/pages/thanks"
  data-already-loggedin="{{ routes.account_url }}"
>Button</button>
On the same button, you can specify three more attributes in addition to data-form.
| Attribute | What to specify |
|---|---|
data-form |
The form ID of the destination form |
data-login-redirect |
Where to redirect customers after login |
data-register-redirect |
Where to redirect customers after sign-up |
data-already-loggedin |
Where to send customers who are already logged in |
To use the three redirect attributes, first select "Specify in code" in Howdy's General Settings and save. With this setting, you can set a different destination after sign-up or login for each button. If you don't need different destinations for each button, you can set them in "Redirect after login" and "Redirect after sign-up" in General Settings without writing code. If you're not used to editing code, you can contact Howdy support (support@macro-micro.co.jp).
Sources: Howdy Help: "Setting up multiple forms" (Japanese) / Howdy Help: "How to specify the redirect after form submission in code" (Japanese)
Related articles
- How to make sign-up form fields required or optional in Shopify: customer metafield settings
- How to add a sign-up form to new customer accounts (Howdy)
Frequently asked questions
Try Howdy free for 14 days
You can reorder sign-up form fields and set up multiple forms from the app's admin. Our dedicated team creates customer metafields, sets up sign-up form fields, and places blocks on the profile page for you, free of charge.